
Who doesn’t love scratch-made flaky biscuits? But making them and baking them… that’s a whole different story. Scratch-made biscuits are a challenge to make without turning them into tough hockey pucks.
Add to that the challenge of temperature control when baking with charcoal in a camp Dutch oven where they can come out gooey and underdone or worse, burned. I’ve been thinking about these two challenges because our friends Lesley Tennesen and Chuck Frost are hosting this year’s National Dutch Oven Gathering (NDOG) and they asked me to teach a class on baking perfect biscuits.
 This year’s National Dutch Oven Gathering will be held in Hillsdale, Illinois at the Sunset Lakes RV Resort October 11-13, 2019. If you are a Dutch oven expert or if you want to learn more about outdoor cooking, this is the event for you! Registration is open now. Let me know if you are going – I’d love to meet you.
In this recipe I will give detailed instructions regarding the process to make the biscuits tender and flaky as well as important steps for temperature control to insure the biscuits are baked and not burned.
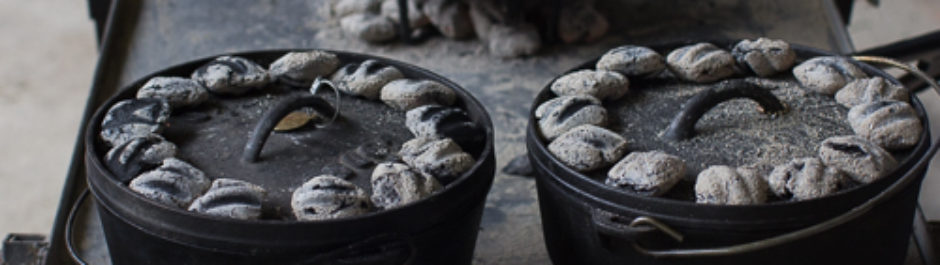
We baked this recipe several times and here’s what we learned about successful biscuits. #1: Do NOT lift the lid. If you want to turn the lid to avoid hot spots, do so carefully. #2 Hang out with your oven during the final minutes of baking. When you smell the lovely aroma of baked biscuits, you know you are close. Let it bake a bit longer. When you take off the lid, steam will waft out. Look for golden brown tops. If they are not golden brown, put the lid back on as quickly as possible. #3 We wrapped our Dutch oven with aluminum flashing. This kept heat close to the oven and prevented the wind from taking the heat away from our very hot oven. #4 Replace charcoal with fresh “tip” coals to insure the Dutch oven is as close to 425 as possible. 
Quick side note regarding a super easy and helpful tech tool: My wonder hubby and “charcoal dude” recommends Dutch Oven Helper App. This application calculates the number of charcoal needed for different functions (simmer, bake, roast of fry) and sized of Dutch oven. For this recipe we increased the number of charcoal on top to 23 but kept the bottom number at 10.

Thanks to Pinterest, I spotted this recipe for Rosemary Goat Cheese Biscuits and knew I had to give it a try. I was intrigued by the idea of goat cheese in a biscuit and wondered about the flavor of these biscuits. Mmmm! Remarkably, the goat cheese adds just a hint of tangy flavor and makes the biscuits so moist and tender.
Enjoy!
Leslie and Steve

| Servings | Prep Time |
| 12-14 biscuits | 30 minutes |
| Cook Time |
| 20 minutes |
|
|
|
|
Tall, flakey, tender... so yummy! These biscuits are perfect to serve with hot soup, warm scrambled eggs, or split with a slice of ham in the middle.
|
- 2 cups all-purpose flour Plus about 1/8th of a cup to roll out dough
- 1 teaspoon salt
- 1/2 teaspoon finely ground black pepper
- 4 teaspoons baking powder
- 2 tablespoons sugar
- 3 tablespoons chives, chopped freeze dried
- 1 tablespoon chopped rosemary
- 1/2 teaspoon garlic powder
- 1/2 teaspoon onion powder
- 3 tablespoons unsalted butter, COLD
- 6 ounces goat cheese, crumbled
- 1 cup heavy cream
- 1 tablespoon melted butter OR heavy cream
- Kosher or Fleur del Sel Salt optional but highly recommended
- Prepare a 12-inch camp Dutch oven by spraying it with oil or rubbing a pat of butter all over the bottom of the oven.
- In a large bowl, add flour, salt, pepper, baking powder, sugar, chives, rosemary, garlic powder, and onion powder. Using a large fork, whisk the ingredients together until herbs are distributed equally throughout the flour.
- Unwrap a whole (8 tablespoons) stick of butter half way down, leaving one half wrapped and the other unwrapped. Fold the wrap back to show markings for tablespoons. Make a mark showing the top 3 tablespoons. Using the largest holes of a box grater, quickly grate three tablespoons of butter into the flour and herb mixture. Carefully toss the grated butter into the flour mixture, taking care to coat each strip of butter and separating clumps. Try NOT to touch the butter with your fingers.

- Add crumbled goat cheese, tossing with fork and breaking up clumps into pea size pieces.

- Add heavy cream to flour/butter/cheese mixture. With as few strokes as possible (under 20), toss the flour into the cream using a rubber spatula, scraping the sides of the bowl. The goal is to just barely work the dough. It will be shaggy and a mess, but that is OK! Your biscuits will be tender thanks to this gentle step!
- Sprinkle a lot flour (approximately 1/8 cup) onto work area, then dump shaggy dough out. Place prepared Dutch oven, rolling pin, bench scrapper, and biscuit cutter within arms reach.

- Generously sprinkle flour over your hands, then gently push dough into a square that is about 8-9 inches on each side. The dough will be very sticky but don't worry. Add more flour to your hands or to the top of the square as needed, but as sparingly as possible.

- Gently roll the square out until it is about 16-inches or doubled in size. Add flour as needed but sparingly to keep rolling pin from sticking to dough. Use bench scrapper to make sure the bottom of the dough is not sticking to the work surface. The first roll out will be messy. Messy is good!

- Using a bench scrapper, fold one third of one side over and repeat for the other side, in the fashion of folding a business letter. Using your bench scrapper, turn the dough 45 degrees. Again, the dough will be shaggy and a mess.

- Gently roll out dough until it is about 1/2 inch thick. Repeat turning, folding (business letter) rolling out, and turning two more times. These folds create the layers in each biscuit. The dough should start to hold together.

- Fold business letter one more time, and roll out to about 3/4 inch thickness. Using a 2-inch biscuit cutter, cut out biscuits and place in prepared camp Dutch oven. Gently press together remaining dough and roll out to 3/4 inch thickness to cut more biscuits. (I had a more dough than I could fit in my 12-inch Dutch oven. You can save these remaining biscuits in plastic wrap in the freezer). Brush tops of biscuits with heavy cream and sprinkle with salt.

- OPTION: These unbaked biscuits freeze beautifully. If you don't want to bake all of the biscuits now, place the unbaked biscuits in a zip top bag and remove as much air as possible. Do not thaw before baking. To bake a smaller batch in a smaller Dutch oven, adjust the charcoal according to a chart or the Dutch Oven Helper. We added more heat the lid but kept the bottom as directed.
- Fire up a chimney of charcoal. When the charcoal's tips are grey, make a circle of 10 hot charcoal to fit beneath the bottom of the 12-inch camp Dutch oven. Place oven over the circle of hot charcoal. Add 23 hot charcoals around the lid of the oven. Wrap in aluminum flashing or wind protector., Bake for 18-20 minutes, taking care to closely monitor the oven over the final two minutes by smelling the aroma from the oven. If you smell acrid burning, immediately remove lid and oven from charcoal. Do NOT lift the lid at any time to insure your oven remains at 425F.
